
Is your commercial garage door getting harder to open or close? Many business owners face trouble with their garage door springs each year. This guide will show you how to adjust garage door springs for better performance and safety.
We’ll walk you through simple steps to fix common spring problems and keep your door running smoothly.
Key Takeaways
- Commercial garage doors use two main spring types: torsion springs (lasting 7-12 years/50,000 cycles) and extension springs (lasting up to 15,000 cycles).
- Regular maintenance every three months keeps springs working well. Use silicone-based lubricants on the coils while the door is closed. Proper tools like winding bars, vice grips, and safety gear are must-haves for adjustments.
- Torsion springs need specific turns based on door height – 7.8 turns for 7-foot doors and 8.8 turns for 8-foot doors. The door should stay in place when lifted halfway if the springs are balanced right.
- Signs of spring problems include slow door movement, strange noises, and uneven operation. Check springs monthly for rust or damage. A balanced door needs little force to move up or down.
- Safety is crucial when working with garage door springs. Always disconnect power, wear safety gear, and work on one spring at a time. Wrong-sized springs or skipping professional help can lead to serious problems.
Understanding Commercial Garage Door Springs
Commercial garage doors rely on two main types of springs to lift heavy panels with ease. These powerful springs store mechanical energy to help balance the door’s weight, making it simple for both manual operation and automatic openers to work smoothly.
Torsion Springs
Torsion springs sit above your garage door and help lift heavy doors with ease. These metal coils pack serious power, lasting between 7 to 12 years of regular use. Each spring works by twisting and untwisting to move your door up or down smoothly.
Most high-quality torsion springs can handle up to 50,000 cycles before needing replacement.
Your garage door’s torsion springs need proper care to work their best. Signs of trouble include loud noises during operation, doors moving slower than usual, or visible damage to the coils.
Regular checks help spot these issues early. The springs must stay well-lubricated and balanced to lift doors safely and effectively.
Extension Springs
Extension springs play a vital role in your garage door system. These springs run along each side of your door tracks and help lift the door’s weight through a pulling motion. Your garage door needs these springs to open and close smoothly up to 15,000 times before they might need replacement.
The springs stretch out as the door closes and contract as it opens, making the door easy to operate.
The springs attach to the door frame and connect to the door through a pulley system. You’ll spot these springs running parallel to the horizontal tracks above your garage door. A properly working extension spring system creates the perfect balance, letting you lift your door with minimal effort.
Strange noises, uneven movement, or a door that slams shut could signal spring issues. Most experts suggest replacing both springs at once to keep your door balanced and working smoothly.
Signs Your Garage Door Springs Need Adjustment
Your garage door springs might need fixing when the door moves slower than usual or makes strange noises during operation. A quick check of your springs can save you from bigger problems, like a stuck door or broken parts that cost more to fix later.
Uneven Door Operation
Uneven garage door operation signals trouble with your commercial roll-up door system. Misaligned hinges and tracks create a jerky motion during opening and closing cycles. The door might stick on one side or move at different speeds across its width.
This uneven movement puts extra stress on the springs and opener, leading to faster wear and tear.
Spring tension plays a big role in smooth door operation. The door needs equal force on both sides to lift and lower properly. Cables and torsion springs require regular checks to spot early signs of problems.
A settling foundation or cracked garage floor can throw off the door’s balance too. The weight of the door must stay balanced through proper spring adjustments to prevent damage to other parts.
Difficulty Opening or Closing
A garage door that becomes hard to open signals spring tension problems. Your door should lift smoothly with minimal effort. Springs need quick attention if the door feels too heavy or drops fast during closing.
The door might also stick halfway or refuse to stay open, creating safety risks for your business operations.
Regular checks help spot these issues before they turn serious. Your commercial garage door springs require proper tension to counterbalance the door’s weight. Strange noises during operation point to spring problems too.
Let’s explore the tools needed for safe spring adjustments in the next section.
Routine Maintenance and Lubrication of Garage Door Springs
Regular maintenance keeps your garage door springs in top shape. Silicone-based lubricants work best to reduce friction on the springs. Your springs need proper care every three months to work smoothly.
Basic tasks like tightening hardware and checking for wear make a big difference in spring life.
Inspect your springs often for signs of rust or damage. Apply lubricant directly to the spring coils while the door stays closed. The garage door should open and close easily after proper lubrication.
Squeaky sounds or rough movement signals that your springs need immediate attention. Commercial roll-up doors need extra care due to their frequent use. Make sure to clean the springs before adding new lubricant to prevent dirt buildup.
Tools Required for Adjusting Garage Door Springs
Proper tools make garage door spring adjustments safer and more effective. You’ll need these essential items before starting any work on your commercial garage door springs.
- Two 16-18 inch winding bars for turning the springs and making tension adjustments
- Two vice grips to secure the torsion shaft during spring adjustments
- An 8-inch wrench for loosening and tightening set screws on the cable drums
- A sturdy ladder tall enough to reach the spring system comfortably
- Heavy-duty work gloves to protect hands from sharp edges and pinch points
- Safety glasses to guard against flying metal particles or debris
- Locking pliers to hold tension during spring adjustments
- A hammer to tap components into proper alignment if needed
- Socket set with various sizes for different hardware types
- Measuring tape to check spring measurements and door balance
- Level tool to ensure proper door alignment during adjustments
- Lubricant spray to reduce friction on moving parts
- Bright flashlight for clear visibility of all components
- Clean rags for wiping excess oil and dirt
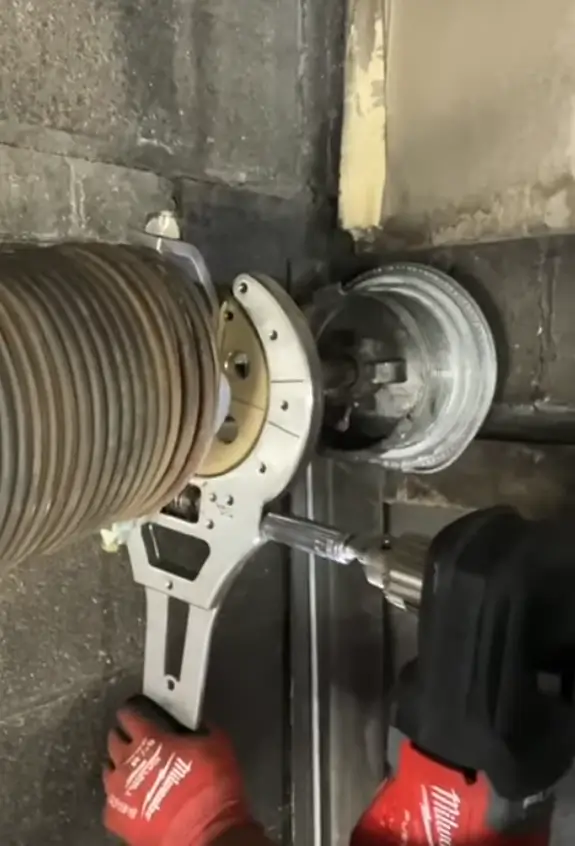
Step-by-Step Guide to Adjusting Torsion Springs
Adjusting garage door torsion springs needs careful attention to detail and safety measures. Here’s a clear guide to adjusting your garage door springs safely and effectively.
- Put on safety glasses and thick work gloves before starting any work on the springs.
- Mark the current position of the torsion spring with chalk to track the number of turns.
- Insert the first winding bar into the bottom hole of the winding cone.
- Loosen the set screws on the winding cone with a wrench while keeping firm pressure on the winding bar.
- Place a second winding bar into the next hole up, then remove the first bar.
- Turn the spring to add tension – 7.8 turns for 7-foot doors, 8.8 turns for 8-foot doors.
- Hold the spring firmly with the winding bar while tightening the set screws.
- Test the door balance by lifting it halfway – it should stay in place.
- Pull down on the pipe with a pipe wrench to increase tension if needed.
- Check the door operation by opening and closing it several times.
- Apply lubricant to the spring coils to reduce friction and noise.
- Test the garage door opener’s force settings after spring adjustments.
- Lock the cam tensioner once the right balance is achieved.
- Double-check all set screws are tight before removing tools.
- Clean up any excess lubricant from the spring and surrounding areas.
Step-by-Step Guide to Adjusting Extension Springs
Extension springs need regular checks to keep your garage door working smoothly. These steps will guide you through a safe adjustment process for your commercial garage door springs.
- Pull the emergency release cord to disconnect the garage door opener from power.
- Lift your garage door halfway and check if it stays in place without support.
- Look for the adjustment wheel or hook on the extension spring that needs fixing.
- Move to the side of the door where the spring feels too loose or tight.
- Put on safety glasses and thick work gloves before touching any springs.
- Hook your spring to a different hole on the track bracket to change the tension.
- Test the door’s balance by lifting it manually to different heights.
- Make small adjustments until the door stays in place at any height.
- Check both sides of the door to ensure equal spring tension.
- Connect the opener back to power once the door moves smoothly.
- Open and close the door several times to test the new spring settings.
- Listen for any unusual sounds that might signal problems.
- Watch the door’s movement to spot any wobbling or jerking motions.
- Fine-tune the tension if needed until the door operates perfectly.
Next, we’ll explore important safety measures to follow during spring adjustments.
Safety Precautions During Adjustment
Safety comes first during garage door spring adjustments. Taking proper precautions protects you from serious injuries.
- Turn off all power to your garage door opener before starting any work. This step prevents accidents from sudden door movements.
- Put on safety glasses and heavy-duty work gloves. These items shield your eyes and hands from spring-related injuries.
- Keep your hands away from springs, cables, and other moving parts. Springs store massive amounts of energy that could cause harm.
- Use proper tools designed for garage door spring adjustments. Standard tools might slip and cause accidents.
- Stay clear of the spring’s path during tension adjustments. Stand to the side of the door while working on springs.
- Never attempt to adjust both springs at once. Work on one spring at a time to maintain door balance.
- Check the condition of winding bars before use. Damaged or worn winding bars can slip during adjustments.
- Secure the garage door in place with C-clamps or locking pliers. This prevents unexpected door movement.
- Mark your spot on the spring before making adjustments. This helps track the number of turns you make.
- Stop work if you notice unusual noises or movements. These signs often signal potential safety issues.
- Keep children and pets away from the work area. Garage door adjustments need full concentration.
- Light up your workspace properly. Good visibility helps prevent accidents during spring adjustments.
Common Mistakes to Avoid
Fixing garage door springs needs careful attention to detail. Many people make simple mistakes that can lead to serious problems with their commercial garage doors.
- Using the wrong-sized springs for the door weight causes uneven operation and puts extra stress on the system
- Skipping professional assessments leads to incorrect spring tension adjustments
- Installing springs without proper tools creates safety risks and door balance issues
- Failing to check both springs for equal tension makes the door pull to one side
- Missing regular lubrication speeds up spring wear and causes squeaky operation
- Trying to adjust springs without removing door weight puts dangerous pressure on components
- Ignoring small issues until they become big problems costs more money in repairs
- Working on springs without proper safety equipment risks serious injury
- Not measuring spring wire size correctly results in poor door performance
- Forgetting to check the mounting hardware leads to loose connections
- Mixing different types of springs affects the door’s balance
- Not testing door operation after adjustments waste time and creates new problems
Let’s explore the step-by-step guide for adjusting extension springs on your commercial garage door.
Tips for Maintaining Proper Spring Tension
Proper spring tension keeps your commercial garage door balanced and easy to open. Regular checks help spot signs of wear before they cause problems. Lift the door halfway manually – it should stay in place without moving up or down.
A properly balanced door needs minimal force to move. Lubricate all moving parts with silicone-based spray every 3 months to reduce friction.
Your garage door springs need regular attention to work safely and smoothly. Look for visible rust, gaps, or damage during monthly inspections. Clean the springs with a soft brush to remove dirt buildup.
Test the door’s balance by disconnecting the opener and lifting it manually. The door should move freely without sticking or binding at any point. Apply lubricant to the springs, rollers, and hinges to stop squeaking and prevent corrosion.
Commercial Garage Door Weather Seal Replacement
A well-maintained weather seal protects your commercial garage door from the elements. Your garage door needs a strong seal to keep out dust, rain, and pests.
- Pull out the old weather seal from the bottom of your garage door using pliers to remove any remaining nails or staples.
- Clean the bottom track of your garage door with a wire brush to remove dirt and rust buildup.
- Measure the width of your commercial door twice to ensure you get the right seal size.
- Cut the new seal to match your door’s width, adding an extra inch on each side.
- Slide the new weather seal into the track at the bottom of your garage door.
- Secure both ends of the seal with screws or weather-stripping nails.
- Test the door several times to make sure the seal moves smoothly during operation.
- Apply silicone spray to help the seal glide better and last longer.
- Check that the seal touches the ground evenly across the entire width of the door.
- Replace any damaged or missing screws in the bottom bracket to keep the seal firmly in place.
- Adjust the limit switches if needed so the door closes fully against the new seal.
- Inspect the seal monthly for signs of wear or damage to maintain your garage door’s performance.
Conclusion
Proper spring adjustment keeps your commercial garage door running smoothly and safely. Regular maintenance extends the life of your door system while preventing costly repairs. Safety remains the top priority during any garage door spring work, so calling professional door technicians makes sense.
Your commercial roll-up door needs expert care to maintain its optimal performance throughout the years.
FAQs
1. How do I know when it’s time to adjust my commercial garage door springs?
When your garage door becomes too heavy to lift, or if one side of the door moves differently than the other, it’s time to adjust spring tension. These signs show your springs need attention.
2. What safety steps should I take before adjusting garage door springs?
Always put safety first by ensuring zero tension on the door, using a proper set of winding bars, and having the right cam-action spring tension holding device. Many door technicians suggest calling a local garage expert for safe adjustments.
3. How many turns should I put on the springs to get the right tension?
The number of turns depends on your door’s weight, but you’ll need to adjust the tensioner’s knurled wheel carefully while watching how the door moves. Keep adjusting until the door easily opens and closes.
4. What’s the best way to maintain commercial garage door springs?
Regular inspection of enclosed factory-lubricated springs helps in maintaining and prolonging the life of your commercial roll-up door. Check that each spring is coated with additives for protection.
5. How do I know if I need to adjust or replace the springs?
If your garage door is becoming increasingly difficult to operate, inspect the springs for wear. The cam tensioner bites should grip the axle and hold the new tension setting properly.
6. What should I check after adjusting the springs?
After adjustment, check the operation of both ends of the door, ensure the set screws in the tensioner are tight, and verify the axle support at both ends works correctly. The door should counterbalance the weight evenly.