
Is your garage door moving unevenly or making strange noises? A common cause is incorrect spring tension, which affects how smoothly your door opens and closes. Adjusting the tension on garage door springs helps balance the door’s weight and makes it work better.
This guide will show you the steps to fix your springs safely, plus vital tips to avoid problems.
Key Takeaways
- Proper spring tension keeps garage doors balanced and prevents uneven movement or slamming. Always wear safety gear like gloves, goggles, and a hard hat when working on springs.
- For torsion springs, use winding bars and make quarter-turn adjustments while tracking changes with chalk marks. The door should stay in place when lifted halfway if the tension is correct.
- Side-mounted springs need adjustment by moving the spring hook up or down one hole at a time on the track hanger. Test the door’s balance after each change.
- Never stand directly in front of springs during adjustments. Make equal changes to both springs to maintain proper door balance.
- Regular maintenance prevents major issues. Check for visible gaps in spring coils and listen for unusual noises. Call experts for complex spring repairs.
Steps to Adjust Tension on Torsion Springs
Fixing torsion springs needs care and the right tools to avoid injury. A winding bar, wrench, and safety glasses will help you adjust the tension safely on your garage door springs.
Secure the door and locate the winding cone
Garage door spring adjustments start with proper safety steps. Safe handling of torsion springs needs careful attention to detail.
- Put on safety glasses, work gloves, and a hard hat before starting any work
- Disconnect the garage door opener from its power source
- Place a C-clamp or locking pliers on both sides of the door track just above the bottom roller
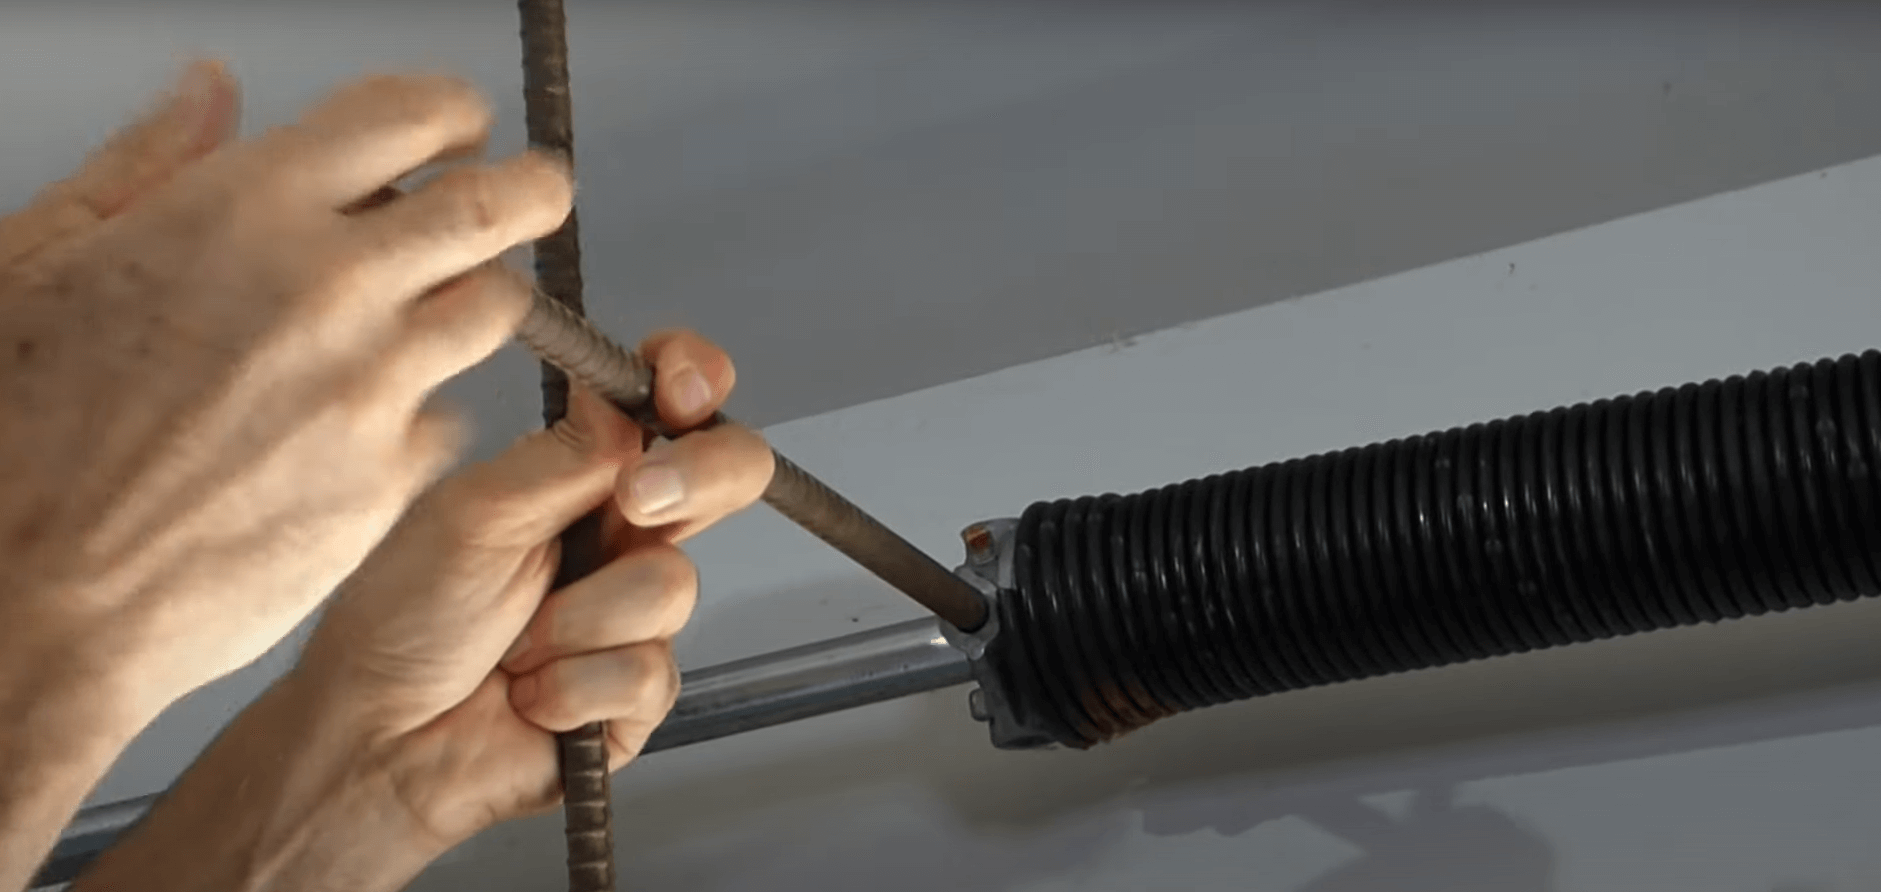
- Look for the winding cone at the end of the torsion spring system – it has four holes and two set screws
- Check that both set screws on the winding cone are tight before making any adjustments
- Stand on a sturdy ladder to the side of the spring, never directly in front of it
- Mark the current position of the winding cone with chalk to track your adjustments
- Clear the work area of any items that could cause trips or falls
- Ensure good lighting in the garage to see the winding cone clearly
- Double-check that the door is fully closed and locked in place before touching any spring parts
Loosen the set screws and adjust the tension
Adjusting garage door spring tension needs careful attention to detail. Your safety matters most during this process.
- Put on safety glasses and work gloves before starting any adjustments.
- Mark the current spring position with chalk or tape for tracking changes.
- Insert a solid steel winding bar into the winding cone’s bottom hole.
- Keep firm pressure on the winding bar while loosening both set screws.
- Turn the winding bar up to add tension or down to reduce tension.
- Make equal adjustments on both springs to maintain door balance.
- Count each quarter turn as you adjust the tension.
- Stop after each full turn to test the door’s movement.
- Tighten the set screws while holding the winding bar steady.
- Pull the winding bar straight out once the screws are tight.
- Test the door’s balance by lifting it halfway – it should stay in place.
- Apply a light coating of lubricant to reduce friction on moving parts.
- Double-check all screws are tight before final testing.
- Lift the door manually to ensure smooth operation.
Tighten the screws and test the door balance
Proper screw tightening ensures your garage door stays safe and balanced. Testing the door balance helps prevent accidents and extends the life of your springs.
- Put on safety glasses and work gloves before touching any garage door parts
- Insert a winding bar into the winding cone’s bottom hole and hold it firmly
- Turn each set screw clockwise until they grip the shaft tightly
- Remove the winding bars and pliers from the spring assembly
- Disconnect the garage door from the automatic opener
- Lift the door halfway manually – it should stay in place without support
- Move the door up and down to check if it feels lighter than before
- Listen for any grinding or squeaking sounds during operation
- Check both sides of the door move at the same rate
- Reconnect the automatic opener to the garage door
- Run the door through several full cycles to ensure smooth operation
- Make small adjustments if the door still feels heavy or uneven
- Test the auto-reverse safety feature on your opener
- Lock all set screws firmly one final time for safety
Steps to Adjust Tension on Side-Mounted Springs
Side-mounted springs need careful handling to stay safe and work well. You’ll need basic tools like wrenches and pliers, plus safety gear such as gloves and goggles to adjust these springs correctly.
Open and secure the door
Opening your garage door needs careful steps for safety. Proper door security prevents accidents during spring adjustments.
- Pull the emergency release cord to disconnect the door from the opener system.
- Lift the garage door until it reaches its full height position.
- Place a sturdy C-clamp right under the bottom roller track on both sides of the door.
- Check if the door stays firmly in place by gently pushing up and down.
- Lock the door with locking pliers beneath each bottom roller for extra security.
- Mark the current spring position with masking tape or a marker for reference.
- Test the door’s stability one final time before moving to the next steps.
Now that your door is secure, let’s move on to making the needed spring adjustments.
Adjust the spring hook and test functionality
Now that your door is safely secured, you’ll need to focus on the spring adjustments. Making changes to your garage door springs needs careful attention to detail and proper testing after each step.
- Take off the big hook that joins the spring to the track hanger. Use steady hands and keep your grip firm during this step.
- Move the spring hook up or down one hole at a time on the track hanger. This small change makes a big difference in how your door works.
- Check if the door closes flat against the ground. Look for any gaps between the door and the floor.
- Fix uneven closing by moving the spring on the side that shows a gap. Your door should touch the ground on both sides at the same time.
- Pull the door down halfway and let go. A well-balanced door will stay in place without moving up or down.
- Test the door’s movement several times. Open and close it fully to make sure it moves smoothly without sticking.
- Listen for any strange noises during the operation. Your door should move quietly without squeaks or grinding sounds.
- Watch the door’s speed as it moves. The door should not slam shut or shoot up too fast.
- Make more adjustments if needed, but only change one hole at a time. Small changes help avoid putting too much stress on the springs.
- Double-check all hooks and connections before you finish. Every part should be tight and secure.
Troubleshooting Common Garage Door Spring Adjustment Issues
Common garage door spring issues often show clear warning signs. Your door might struggle to open or close smoothly, leaving noticeable gaps at the bottom. Uneven door movement points to improper spring tension that needs quick fixing.
The springs may stretch too much on one side, making the door tilt or move faster than normal. A door that slams shut or won’t stay open signals that your garage door springs need adjustment right away.
Fixing these problems starts with a basic check of both springs. Look for visible gaps or breaks in the spring coils during your inspection. The door should lift halfway and stay in place without support if the tension is right.
Strange noises during operation could mean the springs need lubrication or replacement. The springs might also lose their proper tension if the door opens or closes too quickly. Safety comes first during garage door spring maintenance, so let’s explore the essential safety measures to follow.
Safety Precautions During Adjustment
Safety comes first with garage door spring adjustments, and you’ll need safety glasses, work gloves, and the right tools to avoid injuries while working on your door. Want to learn the exact steps to adjust your springs safely? Let’s move on to the next section.
Use proper tools and protective gear
Proper tools make garage door spring adjustments safer and easier. A sturdy ladder helps you reach torsion springs mounted above the door. Your toolbox needs an adjustable wrench, C-clamp, and special winding bars for spring tension work.
Grab a marker or masking tape to mark your progress during adjustments.
Hard hats, safety glasses, and thick gloves protect you from serious injuries. Your eyes need shields from flying metal pieces. Gloves guard your hands against sharp edges and pinch points.
These items create a barrier between you and possible dangers during garage door repairs. Moving on to common issues that pop up during spring adjustments….
Avoid over-tightening or uneven adjustments
Now that you have your tools ready, let’s focus on making safe adjustments to your garage door springs. Over-tightening springs create dangerous tension that can snap the metal coils.
Your garage door needs equal tension on both springs to work right. Make small changes of just a quarter-turn at a time to adjust garage door springs safely. Too much tension on one side will make your door tilt and bind.
Uneven adjustments cause extra stress on your automatic garage door system. The door operates smoothly only if you adjust both springs equally during maintenance. Check the door’s balance after each adjustment by lifting it halfway – it should stay in place without help.
The weight of the door must spread evenly across both springs to prevent damage. Stop adjusting if you notice the door moving unevenly or hear grinding noises.
Conclusion
Fixing garage door springs needs careful steps and safety measures. Your garage door will work better and last longer with proper spring tension. Smart homeowners know their limits and call experts for complex spring repairs.
You can handle basic spring adjustments with the right tools and safety gear. Stay safe and keep your garage door running smoothly through regular checks and maintenance.
FAQs
1. How do I know if my garage door springs need adjustment?
If your door opens or closes too quickly, moves unevenly on one side, or feels too heavy, your springs need to be adjusted. Different spring types, like torsion springs or extension springs, may show different signs of tension problems.
2. Can I adjust garage door springs myself?
While some DIY folks try adjusting garage door springs, it’s safer to call a professional garage door service. Springs have high tension and can cause injury if not handled right. If you must do it, always use proper tools like an adjustable wrench and screwdriver.
3. What’s the process for adjusting extension springs?
First, secure the door to the opener. Then, hook the spring onto a higher hole to increase tension or a lower hole to decrease tension. Always adjust both sides of the door equally to keep proper balance.
4. How often should I check the spring tension on my garage door?
As part of regular garage door maintenance, check spring tension monthly. Look for signs like uneven movement or the door not staying in place. Also, remember to lubricate the springs to keep them working smoothly.
5. What safety steps should I take when adjusting garage door springs?
Before trying to adjust the springs, secure the door with clamps. Use a cord to release the spring tension slowly. Never stand directly under the springs while making adjustments, and always test your door after changes.
6. How do I adjust torsion springs?
Torsion springs are mounted above the door and need special tools to adjust. You’ll need to increase or decrease the spring tension using proper winding bars. Making single-hole adjustments at a time helps ensure your garage door stays balanced.